Well, I've given this a lot of thought. Considering there have been no comments, safe to say, this blog has been for my benefit. And it's been fun, but honestly, the reason I picked up anticlastic forging was to distract myself while waiting to create in my Precious Metalsmithing class at the Craft Barn.
Now, I've made my first ring. I have one class to go out of the 6 week, once an evening class. And I know I've learned the basics, and this is what I want to take and run with.
I"ve got a good start.
One life to live.
Give yourself permission to change your mind. ;)
Anticlastic Daily
Intro
I am always after the next, new hobby. I'm a serial hobbyist. I try something, and do it not half badly, but then I get intrigued by something else, and I'm off again. So, after over 1/2 century of this behavior, I'm going to be stern with myself. My 'newest' shiny is anticlastic metalworking. My experience in metalworking? One introduction metalsmithing class at the local University Craft Center where I learned about safety and a youtube video. I kid you not.
So my goal is to do an anticlastic piece almost every day and record the results over the next year. See what I learn, see what happens, see the ideas, see what I do with it, see where it ends up! Wish me luck.
Saturday, August 11, 2012
Friday, August 10, 2012
Day 28
Yes, I eased up on the 'every day or else' mentality! Dayjob work starts soon, and I'm beginning silversmithing, which began at the same time as hammering! Here's my first ring:
..and reluctantly I have to accept that there are only so many hours in a day.
On to copper! I wanted another stubby. I still sometimes confuse which way the curve goes when hammered.
I am thinking simple pendants. AND I needed to do something polar opposite from spidey yesterday. :D
 |
| Before |
 |
| After |
I am thinking simple pendants. AND I needed to do something polar opposite from spidey yesterday. :D
Thursday, August 9, 2012
Day 26
Tuesday, August 7, 2012
Day 25
First some fun with galpal Jill and the stamps we ordered. Still planning to add a stone.
11:49pm : Thought this would be interesting. Although I was disappointed at how little the metal moved, compared to how yesterdays did! I really expected the thinner half to move more. Although now it seems obvious why it wouldn't.
 |
| Before |
It was still fun to move around. A pretty gold color too, after pickling and heat coloring. Looks gold!I wonder how that happened?
 |
| After |
Monday, August 6, 2012
Day 24
7:55pm - I wanted skinny on yesterday, so I made tall and skinny! I tried to hammer halfway in the width, but I wasn't always successful.
I hammered until it formed a full circle. Quenched in water, pickled in vinegar.
Fun! I annealed (score!) and it was fun to twist up. Serpent-ish. And I wanted to combine it with yesterday's stumpy. Here are the two entwined, with a Mexican Crazy Lace egg shaped cab nestled in stumpy. I also got the chance to polish a bit with bobbing compound on my new toys, and heat colored it. Although if I solder on a bezeled stone, I'll have to repeat that.
 |
| Before |
 |
| After |
Sunday, August 5, 2012
Day 23
11:12 pm: Skip today. Unless you want to be bored. : /
I had high hopes! I was thinking it would turn into a tall curling tip, and a ruffled 'flower' on the end. Silly me. So did not happen. It got 1/2 again as tall, not much of a curve, and I got what I *should* have known would be a stubby leaf. If I had more experience. Which is why I'm doing this blog!
Here's 'stubby.'
Tomorrow, I'm going to try and do a narrow double strip and see if I can put it together. Hmmmmm...
 |
| Before |
 |
| After |
Tomorrow, I'm going to try and do a narrow double strip and see if I can put it together. Hmmmmm...
Saturday, August 4, 2012
Day 22
10:01pm:
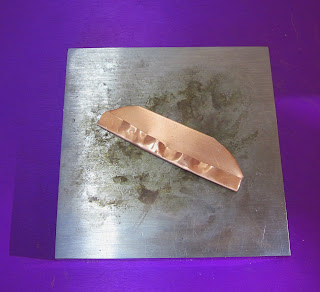
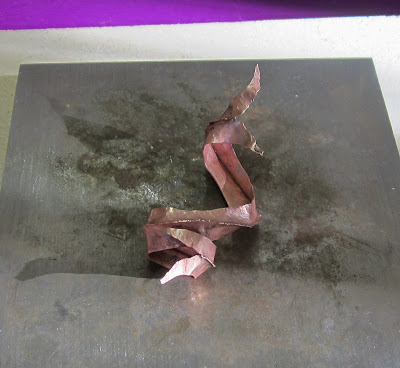
Well. I finally figured out that I've been doing this whole thing 1/2 baked.
Or in this case, 1/2 annealed.
I'd like to preface this that I have no experience with heating up metal. So when I read that you needed to get it hot, I figured it was hot enough when I got the nice pretty red colors on copper. When I read about Lawton-Brain suggesting that you should 'open' the copper shapes with quickly with your hands, I just thought, 'Wow, he has strong hands!' The copper still moved, just not as much as pictures I've seen. But I'm just beginning, so I thought it was hammer facility~
I started with the basic shape, my objective was trying to get it to ruffle. Pretty ruffles that I've seen googling 'anticlastic.' I read somewhere that you hammer the unfolded side. I did that yesterday. It was different than hammering the folded side, but no ruffles. Then I thought, well, maybe I need to hammer one time on the unfolded side, creating hammer marks that would work like dams, and then continue to hammer the folded side. NO ruffles.
Then, in my slow logic, I remembered my class from last Wednesday, and the teacher was showing us with silver, how it needed to glow a deep red, almost molten! for it to be annealed. And then I remembered the night before when I soldered the thin 30g copper bezel, and how it turned slightly molten looking and ended up a dark grey blue, and after I quenched it, it was like butter!
So I heated it up. Until it was past the pretty colors. Past the light torch trails tracking on the metal. Until it was a dark blue steel color. Then I quenched it.
WOW. It was soft. I felt like Superman manipulating it!
Of course, I will have to polish it and color it, since it will have to be pickled to get rid of the residue, but this opens up things for me! (see what I did there?)
Well. I finally figured out that I've been doing this whole thing 1/2 baked.
Or in this case, 1/2 annealed.
I'd like to preface this that I have no experience with heating up metal. So when I read that you needed to get it hot, I figured it was hot enough when I got the nice pretty red colors on copper. When I read about Lawton-Brain suggesting that you should 'open' the copper shapes with quickly with your hands, I just thought, 'Wow, he has strong hands!' The copper still moved, just not as much as pictures I've seen. But I'm just beginning, so I thought it was hammer facility~
 |
| before |
I started with the basic shape, my objective was trying to get it to ruffle. Pretty ruffles that I've seen googling 'anticlastic.' I read somewhere that you hammer the unfolded side. I did that yesterday. It was different than hammering the folded side, but no ruffles. Then I thought, well, maybe I need to hammer one time on the unfolded side, creating hammer marks that would work like dams, and then continue to hammer the folded side. NO ruffles.
Then, in my slow logic, I remembered my class from last Wednesday, and the teacher was showing us with silver, how it needed to glow a deep red, almost molten! for it to be annealed. And then I remembered the night before when I soldered the thin 30g copper bezel, and how it turned slightly molten looking and ended up a dark grey blue, and after I quenched it, it was like butter!
So I heated it up. Until it was past the pretty colors. Past the light torch trails tracking on the metal. Until it was a dark blue steel color. Then I quenched it.
WOW. It was soft. I felt like Superman manipulating it!
 |
| After |
Subscribe to:
Posts (Atom)


